Create an Automation
To create an automation for the CMDB:
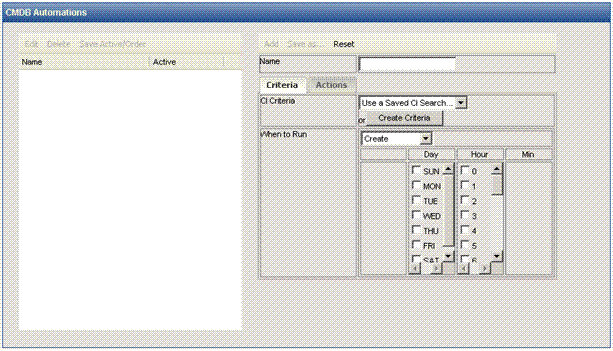
- From the CMDB homepage, select Administration from the toolbar and then select Automations from the main frame. The automations page is displayed.
- Enter a name for the automation in the Name field.
- Select a saved search or create custom automation criteria for the CI. The automation criteria, whether a saved search or a custom search, determine which CI, when the CI is saved, triggers an escalation.
- Saved search—To use a saved search, select the search from the drop-down field. If you can't recall the search criteria for the saved searches, you will have to leave the automations page to review them. To review the saved search criteria, select Search | Saved from the CMDB toolbar. A summary of the saved searches and their criteria is displayed in the main frame.
- Custom search criteria—To create custom automation criteria, click the Create Criteria button. The CMDB search page is displayed. Refer to CMDB Search for details on setting criteria in this page. When you have set your criteria, click the Return Criteria button.
- Specify the When to Run values.
- Select whether to run the automation when a CI is created only, edited only, created or edited, or periodically using the drop-down field. When you set the automation to run periodically, a drop-down field is displayed in which you set the period at which the automation runs. Options in the new field, which apply to Periodic Check only, are Hourly, Daily, Weekly, and Monthly. The Periodic check is run once an hour, day, week, or month according to the specified value. Periodic checking may result in a great many emails being sent and Issues being created, so use extreme caution with the periodic value.
- If you want to run the automation upon creation, editing, or creation and editing of a CI, choose the times when the automation will run from the day and time checkboxes. You can choose any or all days of the week and any or all times of day. By default, all values are selected.
- Specify the action(s) to be taken when a CI matches the criteria at least one must be specified. Click the Actions tab.
- Change Status—Click the checkbox to change the Status field of the matching CI or CIs, then select the status to which the field should be changed.
- Create Issue—Click the checkbox to create an Issue when a CI matches the criteria. The matching CI or CIs will be linked to the Issue that is created.
- Project—Select the project in which to create the Issue.
- AB Primary Key—Enter an Address Book primary key. The
Primary Key is a unique identifier for each contact in your Address Book.
If the
Customer Self-service feature is used, it is the ID that Customers use
to log into FootPrints (along
with a password). This
field should be both present and unique to all contacts. User
ID is the recommended field, and also the default for all templates
- Per CI or Aggregate CIs—The Aggregate CIs option is only available when the Periodic Check value is selected for When to Run the automation. Choose whether an Issue is created for every CI that matches the criteria or, if Periodic Check was selected, all CIs that match the criteria when the automation is run are linked to a single Issue.
- Create Issue As—Select a Quick Issue (either a regular Quick Issue or a Master Quick Issue) to be used to create the Issue. You must have at least one Quick Issue in the selected project in order to use the Create Issue function of CMDB automation.
- Send Email—Click the checkbox to send an email when a CI matches the criteria.
- Contacts—Send the email to AB contacts linked to the CI or CIs.
- Additional Emails (one per line)—Enter email addresses, one per line, to receive an email when a CI matches the criteria.
- Per CI or Aggregate CIs—The Aggregate CIs option is only available when the Periodic Check value is selected for When to Run (Criteria tab). Choose whether an email is sent for each CI that matches the criteria or, if Periodic Check was selected, a single Issue to which all CIs that match the criteria are linked.
- Template—Click the Template button to build the template for the email. When you click the button, the template window is displayed.
- Insert Variable—The Insert Variable drop-down boxes insert a variable into the field below it. The first Insert Variable drop-down is for the Subject of the email and the second Insert Variable drop-down is for the Body of the email. Variables represent automation and CI data. Select as many variables as you wish, one at a time, to be inserted.
- Subject—The variables and text you enter in this field become the subject line of the email.
- Body—The variables and text you enter in this field become the body of the email message.
- HTML or Text—Choose whether to send the email as HTML or text.
- Email field checkbox(es)—If you have an email field or fields set as a CI attribute, a checkbox is displayed for sending email to the address(es) designated in the field(s). For example, if you have a field called "Support Email", a "Support Email" checkbox is displayed here.
- Run Script—Check the box and then enter the path and filename to an external script. If the checkbox is checked, the script is run when a CI matches the criteria.
- Click the Add button to add the automation or click the reset button to clear all of the fields in the automation and begin again. If you add the automation, the fields are cleared and the automation name and status are displayed in the list of automations on the left side of the main frame.